Getting Started with Kubernetes Deployments: Helm, GitOps, and ArgoCD
The Problem: Raw Kubernetes is Hard to Manage
When you first start deploying applications to Kubernetes, you'll likely begin with raw YAML files and kubectl apply. For a simple application, this might look like:
kubectl apply -f deployment.yaml
kubectl apply -f service.yaml
kubectl apply -f ingress.yaml
This works fine for learning, but quickly becomes unmanageable as you add:
- Multiple environments (development, staging, production)
- Configuration variations between environments
- Multiple applications
- Team collaboration
- Change tracking and rollbacks
That's where Helm, GitOps, and ArgoCD come in. They solve these problems by adding structure, automation, and best practices to your Kubernetes deployments.
Helm: The Kubernetes Package Manager
Think of Helm like npm for Node.js or pip for Python, but for Kubernetes applications. Instead of managing individual YAML files, you work with Charts - packaged applications that can be easily installed, upgraded, and shared.
Key Concepts
Helm Chart: A directory structure containing all the Kubernetes YAML files needed to run an application, plus templates and configuration options.
my-web-app/
├── Chart.yaml          # Chart metadata
├── values.yaml         # Default configuration
├── templates/          # Kubernetes YAML templates
│   ├── deployment.yaml
│   ├── service.yaml
│   └── ingress.yaml
└── charts/            # Dependencies (other charts)
Templates: Instead of static YAML, Helm uses templates with placeholders:
# templates/deployment.yaml
apiVersion: apps/v1
kind: Deployment
metadata:
  name: {{ .Values.appName }}
spec:
  replicas: {{ .Values.replicaCount }}
  template:
    spec:
      containers:
      - name: web
        image: {{ .Values.image.repository }}:{{ .Values.image.tag }}
Values: Configuration that gets plugged into templates:
# values.yaml
appName: my-web-app
replicaCount: 2
image:
  repository: nginx
  tag: "1.21"
Releases: A deployed instance of a chart. You can have multiple releases of the same chart (e.g., my-app-staging and my-app-production).
Basic Helm Commands
# Install a chart from a repository
helm install my-release bitnami/nginx

# Install your own chart with custom values
helm install my-app ./my-chart --values production-values.yaml

# Upgrade a release
helm upgrade my-app ./my-chart --set image.tag=v2.0.0

# See what's deployed
helm list

# Rollback to previous version
helm rollback my-app 1
Why Helm Helps
- Reusability: One chart can deploy to multiple environments with different configurations
- Versioning: Track what version of your application is deployed where
- Rollbacks: Easy to revert to previous versions
- Packaging: Share applications with others through chart repositories
GitOps: Infrastructure as Code, Git as Truth
GitOps is a way of managing infrastructure and applications where Git repositories become the single source of truth for what should be running in your systems.
Core Principles
- Everything in Git: All configuration, infrastructure definitions, and application manifests live in Git repositories
- Declarative: You describe what you want (desired state), not how to get there
- Automated: Tools automatically make your infrastructure match what's in Git
- Auditable: Git history shows who changed what and when
Traditional vs. GitOps Deployment
Traditional (Push-based):
Developer → CI/CD Pipeline → kubectl apply → Kubernetes Cluster
GitOps (Pull-based):
Developer → Git Repository → GitOps Controller → Kubernetes Cluster
GitOps Repository Structure
A typical GitOps repository might look like:
k8s-deployments/
├── applications/
│   ├── web-app/
│   │   ├── base/              # Common configuration
│   │   └── environments/
│   │       ├── development/
│   │       ├── staging/
│   │       └── production/
│   └── api-service/
├── infrastructure/
│   ├── monitoring/
│   └── ingress/
└── clusters/
    ├── dev-cluster/
    └── prod-cluster/
Benefits of GitOps
- Visibility: See exactly what's deployed by looking at Git
- Rollbacks: Revert to any previous Git commit
- Collaboration: Use standard Git workflows (pull requests, code reviews)
- Disaster Recovery: Rebuild entire environments from Git
- Security: No need to give deployment tools direct cluster access
ArgoCD: GitOps Made Easy
ArgoCD is a tool that implements GitOps for Kubernetes. It continuously monitors Git repositories and automatically synchronizes your cluster to match what's defined in Git.
How ArgoCD Works
- Repository Monitoring: ArgoCD watches specified Git repositories for changes
- Desired State Comparison: It compares what's in Git with what's running in the cluster
- Synchronization: When differences are detected, ArgoCD updates the cluster to match Git
- Health Monitoring: It continuously checks that applications are running correctly
ArgoCD Application Definition
Here's how you tell ArgoCD about an application to manage:
apiVersion: argoproj.io/v1alpha1
kind: Application
metadata:
  name: my-web-app
  namespace: argocd
spec:
  # Where to find the application definition
  source:
    repoURL: https://github.com/mycompany/k8s-configs
    path: applications/web-app/environments/production
    targetRevision: main

  # Where to deploy it
  destination:
    server: https://kubernetes.default.svc
    namespace: web-app

  # Sync policy
  syncPolicy:
    automated:
      selfHeal: true    # Fix manual changes automatically
      prune: true       # Remove resources not in Git
ArgoCD Features
- Web UI: Visual dashboard showing application status and sync state
- CLI Tool: Command-line interface for managing applications
- Multi-cluster Support: Manage applications across multiple Kubernetes clusters
- RBAC: Role-based access control for different teams
- Rollback: Easy rollback to previous Git commits
- Drift Detection: Alerts when cluster state doesn't match Git
Putting It All Together: A Complete Workflow
Here's how these tools work together in practice:
1. Create a Helm Chart
helm create my-web-app
# Edit templates and values.yaml
2. Store Chart in Git
git add my-web-app/
git commit -m "Add web app Helm chart"
git push origin main
3. Create ArgoCD Application
# argocd-apps/web-app.yaml
apiVersion: argoproj.io/v1alpha1
kind: Application
metadata:
  name: web-app-prod
spec:
  source:
    repoURL: https://github.com/mycompany/helm-charts
    path: my-web-app
    targetRevision: main
    helm:
      valueFiles:
        - values-production.yaml
  destination:
    server: https://kubernetes.default.svc
    namespace: production
  syncPolicy:
    automated: {}
4. Deploy via Git
kubectl apply -f argocd-apps/web-app.yaml
5. Make Changes
# Update image tag in values-production.yaml
git add values-production.yaml
git commit -m "Update web app to v1.2.0"
git push origin main
# ArgoCD automatically deploys the change!
Choosing Your Deployment Strategy
The key question isn't "which tool is best?" but rather "which tool fits my current needs?" Here's a decision tree to help:
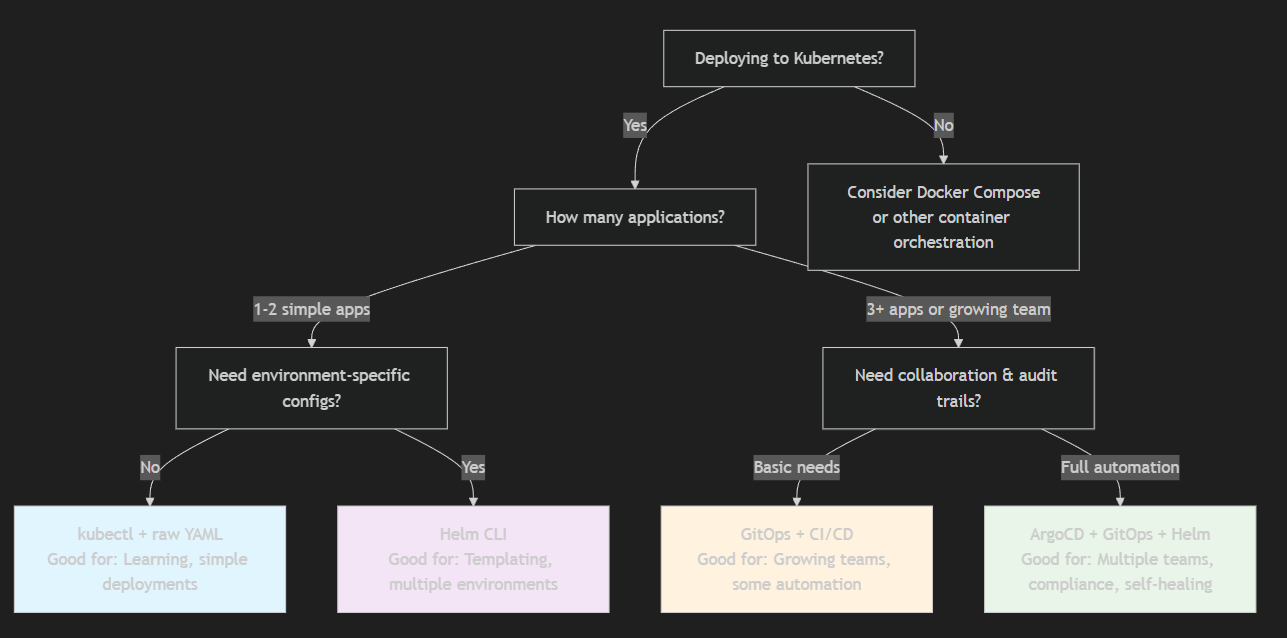
When to Use Each Tool
Start with Helm if you need:
- Template-based configuration management
- Environment-specific deployments
- Application versioning and rollbacks
- Reusable application packages
Add GitOps when you want:
- Audit trail of all changes
- Collaborative deployment workflows
- Disaster recovery capabilities
- Separation of code and deployment workflows
Implement ArgoCD when you have:
- Multiple applications to manage
- Multiple environments or clusters
- Need for automated sync and drift detection
- Teams that need self-service deployments
Common Beginner Mistakes
- Over-templating Helm charts: Start simple, add complexity only when needed
- Putting secrets in Git: Use tools like Sealed Secrets or external secret management
- Manual kubectl changes: Resist the urge to fix things directly - always go through Git
- Ignoring resource limits: Always set CPU and memory limits in your Helm charts
- Not testing locally: Use
helm templateandkubectl --dry-runto test changes
Next Steps
- Practice with Helm: Create a simple chart for a basic web application
- Set up a GitOps repository: Start with a single application and simple structure
- Install ArgoCD: Try it in a development cluster first
- Learn kubectl basics: These tools complement, don't replace, Kubernetes knowledge
- Understand YAML: Get comfortable reading and writing Kubernetes manifests
Learning Resources
- Helm Documentation: helm.sh
- ArgoCD Getting Started: argo-cd.readthedocs.io
- GitOps Guide: www.gitops.tech
- Kubernetes Basics: kubernetes.io/docs/tutorials/
Remember: these tools solve real problems, but they add complexity. Start simple, understand the problems you're trying to solve, and add sophistication gradually as your needs grow.